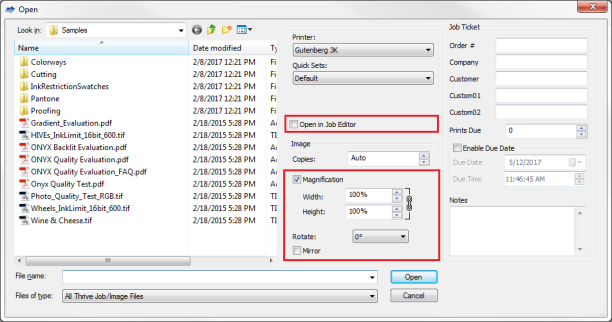
Click the [Open] icon on the toolbar, or select File > Open from the menu. This displays the “Open” dialog (Figure 1).
On the middle of the dialog, select the printer you want to use from the drop-down menu. If you have developed Quick Sets, select your Quick Set. If you have not, leave this setting as [Default]. Quick Set options that match those in the Open dialog will be prepopulated. Any changes you make to those settings in the open dialog will supersede the Quick Set settings.
If you want to send your image to Job Editor, select the [Open in Job Editor] option (Figure 1)..
On the left-side of the dialog, browse to your image, highlight it, and click [Open]. The image will open and move to the “Jobs Ready to Print” area.
When opening a job in RIP-Queue or Job Editor, there are sizing rules to match what can be set up in a Quick Set. The default is to use whatever settings the Quick Set uses.
The Defined by Quick Set option strictly uses the Quick Set settings, with no additional options to override in the UI.
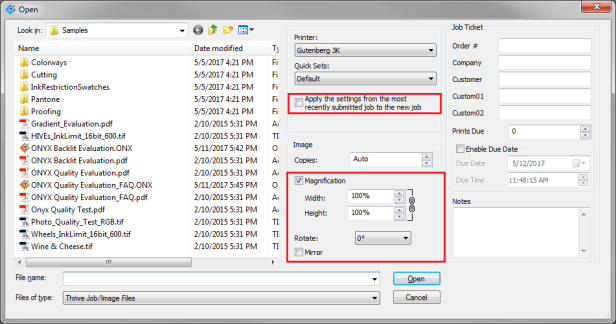
In the “Open” dialog, you will see some of the same options as RIP-Queue (Figure 1). You can also select the box to apply the same settings to this job as the previous job. (Figure 2)
There are following options in the Open dialog in RIP- Queue and Job Editor.
Printer – Chose a printer that you want to use from a drop-down menu.
Quick Sets - Select your Quick Sets in this dialog. (NOTE: You need to set your Quick set before open your job).
Open in Job Editor – Check this option when you want to open an image in Job Editor. (NOTE: This option is showed in RIP-Queue’s Open dialog)
Apply the settings from the most recently submitted job to the new job – Check this option when you want to apply the most recently settings to your new job. (NOTE: This option is showed in Job Editor’s Open dialog)
Copies - The [Copies] value determines how many copies of the job will be printed. If you are printing a PostScript and PDF image, and want to have the number of copies determined by the PostScript and PDF files, select Auto as the copies value.
Magnification – Use this option to enlarge or reduce the size of the image.
Rotate - This option allows you to set the rotation of the job before you print it. Select the degree rotation using drop-down menu that you want to apply the job. The job will be rotated the number of degrees clockwise. (TIP: You also can rotate your image in the [Preview and Size] tab of Job Editor.)
Mirror – This option creates a reverse image (or mirror image) of the original file. This option is normally used when printing on backlit or transparencies. See Rotating & Flipping an Image for more information.
Job Ticket - You can create a job ticket for a job to add information such as Job #, company name, or customer names. Job Tickets allow you to more easily sort and record information about jobs (Figure 1 and 2).
To create a Job Ticket, there are several methods for creating it.
You can open an image by dropping files into a Hot Folder. The Hot Folder will automatically assign Quick Set properties to each image.
To drop images into a Hot Folder:
1. Select your image file, and copy it into a Hot Folder. For example: <program folder>\input\<printer name> or <program folder>\input\<printer name>\Custom Quick Set.
2. The image opens in RIP-Queue, and, depending on your Quick Set Settings, is processed, opened for editing, or printed.
Is RIP-Queue running? Hot Folders are only active when RIP-Queue is running.
Are the jobs read-only? Read-only jobs will not be processed. You can remove read-only restrictions by highlighting the image > right clicking it > selecting Properties > and unchecking the [Read-Only] check box.
Are the images valid (supported) image files? Try opening the file directly into RIP-Queue.